How to fix a Wi-Fi router not connecting to a wireless printer, try resetting both devices and checking the network settings. Here’s a quick guide to help you troubleshoot the issue.
If you’re experiencing difficulty connecting your wireless printer to your Wi-Fi router, there are some steps you can take to resolve the issue. Having a stable and reliable connection is essential for printing wirelessly, so it’s important to identify and address the problem as soon as possible.
In this article, we’ll go over some common reasons for connectivity problems and provide a few troubleshooting tips to help you fix your Wi-Fi connection issues with your printer. By following these steps, you’ll be able to get your wireless printer up and running again in no time.
Check Network And Printer Connection
Is your Wi-Fi router unable to connect with your wireless printer? This can be a frustrating situation, but don’t worry; we’ve got you covered. Follow these steps to troubleshoot the issue and get your printer connected to Wi-Fi.
Verify If The Wi-Fi Network Is Working
First things first, check if your Wi-Fi network is working correctly. If your Wi-Fi network is not working, you will not be able to connect your printer to the network. Here’s what you need to do:
- Check if the Wi-Fi router is powered on and functioning correctly. All the lights on the router should be steady.
- Check if other devices that are connected to the same network can connect to the internet.
- Restart your Wi-Fi router. Sometimes restarting the router can fix the issue.
Check If The Printer Is Connected To The Wi-Fi Network
If your Wi-Fi network is working correctly, the issue could be that your printer is not connected to the network. Here’s what you need to do:
- Check if the printer is powered on and connected to the Wi-Fi network. Most printers have a Wi-Fi symbol that shows if the printer is connected to the Wi-Fi network.
- If your printer is not connected to the Wi-Fi network, you need to connect it. Refer to the printer manual and follow the instructions for connecting the printer to a Wi-Fi network.
- Once you have connected the printer to the Wi-Fi network, try to print a test page to check if the printer is connected to the network.
Identify The Issue Between The Printer And Wi-Fi Connectivity
If you have verified that your Wi-Fi network is working and your printer is connected to the network, but you still can’t print wirelessly, there may be an issue with the connectivity between the printer and Wi-Fi. Here’s what you need to do:
- Check if the printer and the Wi-Fi network are on the same network. If they are not on the same network, you will not be able to print wirelessly.
- Check if there are any obstacles between the printer and the router that are blocking the signal. The obstacles can be walls, other electronic devices, or anything else that is blocking the signal.
- Move the printer closer to the Wi-Fi router to improve the signal strength.
By following these steps, you can troubleshoot the issue and connect your Wi-Fi router to the wireless printer. If the issue still persists, consider seeking professional help.
Restart The Router And Printer
Is your Wi-Fi router not connecting to your wireless printer? This is a common issue that many people face while trying to print documents. However, don’t fret – there’s an easy fix! One of the first things you can do is to restart both the router and the printer.
Here’s how:
Steps To Turn Off The Router And Printer
- Find the power button of your Wi-Fi router and turn it off. Wait for a few seconds, and it should shut down completely.
- Unplug the router from its power source and keep it disconnected for a few minutes. This will help to reset the router’s settings.
- Locate the power button of the wireless printer and switch it off. Wait for it to shut down completely before moving on to the next step.
- Unplug the printer from its power source, and also disconnect it from any other devices that may be connected to it.
- Wait for at least five minutes before turning both the router and the printer back on.
After you have completed these steps, you need to test the connectivity between the router and the wireless printer. The easiest way to do this is to print a test page.
Wait For A Few Minutes Before Restarting Them
This is an important step to ensure that your Wi-Fi router and wireless printer have enough time to reset and clear any issues that may have been causing the connectivity problem. Waiting for at least 5-10 minutes before turning the devices back on is crucial in restoring a stable connection.
Test The Connectivity By Printing A Test Page
After restarting the router and printer, test the connectivity between the devices by printing a test page. This is a quick and easy way to ensure that the devices are communicating with each other.
Restarting your Wi-Fi router and wireless printer is a simple and effective solution to fix connectivity issues. Following these steps can save you a lot of frustration and ensure that your printing is up and running again in no time.
Update Firmware And Software
Fixing a Wi-Fi router that is not connecting to a wireless printer can be quite frustrating, particularly when you have important documents that need to be printed. There are various reasons why this issue can occur, such as faulty printer drivers, obsolete firmware, outdated software, and connectivity problems.
We’ll concentrate on updating firmware and software, and provide you with some practical tips on how to fix the issue.
Importance Of Having Updated Firmware And Software
- Having updated firmware and software is crucial to your printer’s smooth operation. It ensures that your device runs effectively, with new features, security enhancements, bug fixes, and improved performance.
- Outdated firmware and software can cause problems, such as poor connectivity, dropped connections, slow printing speeds, and print quality issues.
- Updating your firmware and software will increase the compatibility and stability of your printer, ensuring that it works seamlessly with your Wi-Fi router.
How To Find The Latest Firmware And Software Updates For The Router And Printer
- Identify your printer model number and go to the manufacturer’s website.
- Find the support section and select your printer model.
- Look for the firmware and software downloads section.
- Download the latest version of the firmware and software specific to your printer model, operating system, and Wi-Fi router.
Steps To Update The Firmware And Software
- Before updating your printer firmware and software, make sure the printer is powered on and connected to the Wi-Fi network.
- Locate the firmware and software files that you downloaded earlier and save them to your computer’s desktop.
- Double-click on the firmware file to open it, and follow the on-screen instructions to install it on your printer.
- Next, install the software update by double-clicking on the software file and following the prompts on your screen.
- After installation, restart your printer and Wi-Fi router, then test your printer to ensure that it’s connected to the Wi-Fi network.
Updating the firmware and software of your Wi-Fi router and printer is critical to keeping your devices operating smoothly. It guarantees that you have access to all the latest features, fixes, and enhancements, ensuring that your printer performs at its best.
Follow the steps outlined above to update your firmware and software, and you’ll be back to printing in no time.
Check Wireless Network Configuration
Wi-Fi connectivity issues with a wireless printer can be frustrating, especially when you need to print something urgently. Fortunately, there are some possible solutions to fix it. One of the most common issues that can cause the wireless printer not to connect is the network configuration.
We will walk you through the steps to check wireless network configuration, which primarily involves verifying the Wi-Fi network settings and SSID, checking if the router is broadcasting its SSID, and disabling the Mac filtering on the router.
Verify Wi-Fi Network Settings And Ssid
To ensure that your Wi-Fi printer is connected to the right network, you need to verify your Wi-Fi network settings and SSID.
Here’s what you need to do:
- Log in to your Wi-Fi router’s configuration webpage using the IP address provided by the manufacturer.
- Click on the wireless settings tab.
- Check and update the wireless network name or SSID (service set identifier) if it does not match the one on the printer.
- Ensure that the mode is set to mixed or wireless-g and that the wi-fi channel is set to auto or a recommended channel.
- Click save or apply.
Check If The Router Is Broadcasting Its Ssid
If your router is not broadcasting its SSID, it will be impossible for your wireless printer to connect to it.
Follow these steps to check and enable SSID broadcast on your router:
- Log in to your Wi-Fi router’s configuration webpage.
- Click on the wireless settings tab.
- Locate the SSID broadcast option and make sure it is enabled.
- Click save or apply.
Disable Mac Filtering On The Router
If the Mac address of your wireless printer is not added to the allowed Mac addresses list on your router, the printer will not connect to the wi-fi network.
Here’s how to disable Mac filtering on your router:
- Log in to your Wi-Fi router’s configuration webpage.
- Click on the security option.
- Locate the Mac filter option and select disabled or turn off the feature.
- Save changes.
Once you have completed these steps, try connecting your wireless printer to the Wi-Fi network. If it still does not connect, try rebooting the printer, router, and computer.
To fix router connectivity issues with a wireless printer, it is important to ensure that the wireless network is correctly configured. By following these steps, you should be able to fix the Wi-Fi connectivity issues with your wireless printer.
Check IP address And Printer Status
How To Check The Printer’s IP Address And Status
If you’re having trouble connecting your Wi-Fi router to your wireless printer, the first step is to check your printer’s IP address and status. Here’s what you need to know:
- Check your printer’s manual or online documentation to find its IP address.
- On a Windows computer, open the command prompt and type “ping IP address” (without the quotes) to verify that your printer is connected to your network.
- On a Mac, go to System preferences > printers & Scanners> options & Supplies> general to see the printer’s IP address.
- Make sure that the printer’s IP address is valid and in range. If it’s not, adjust the settings accordingly.
Verify If The Ip Address Is Valid And In-Range
Having a valid IP address that falls within your network range is crucial for your printer to connect to your Wi-Fi router. Here’s how to verify:
- Check the first three sets of numbers in your printer’s IP address against your Wi-Fi network’s IP address. If they match, you’re good to go.
- To check your Wi-Fi network’s IP address, open your router’s admin panel and look under the network settings or LAN section.
- If your printer’s IP address doesn’t match your network’s IP address, follow the instructions in your printer’s manual to change its IP address.
Check If The Printer Is Not In Sleep Mode
Sometimes, your printer may not be connecting to your Wi-Fi router because it’s in sleep mode. Here’s how to check:
- Press the power button on your printer to wake it up from sleep mode.
- Check the printer’s display panel for any error messages or status updates. If there are any issues, follow the troubleshooting steps in your printer’s manual.
- Make sure that your printer is not set to automatically go into sleep mode after a certain amount of time. You can change this setting in your printer’s control panel or settings menu.
By following these steps, you should be able to connect your Wi-Fi router to your wireless printer smoothly. If you continue to experience problems, consult your printer’s manual or contact customer support for further assistance.
Change DNS Server
If you’re trying to print something, and your Wi-Fi router is not connecting to your wireless printer, it can be a frustrating experience. Fortunately, there’s a solution – changing your DNS server. In this guide, we’ll walk you through everything there is to know about DNS servers, how to change them on your router and printer, and what to do if these options don’t work.
Explanation Of DNS Server And Its Role In Network Connectivity
A DNS (domain name system) server works by translating domain names into IP addresses. In simpler terms, it acts like a phone book for the internet. Without a DNS server, you’d need to remember the IP addresses for every website you’d like to visit.
So, without it, users would have to type in IP addresses to access a website, which is nearly impossible to remember. A DNS server also plays a vital role in network connectivity, without it, we wouldn’t have URLs like facebook.com, for example.
How To Change The DNS Server On The Router
Changing the DNS server on your router is an easy process. All you’ll need to do is:
- Turn on your computer and open your web browser
- Enter your router’s IP address into the address bar
- Log in to your router using your username and password
- Find the “DNS server” settings area and enter your new DNS server address
- Save your changes
Before making any changes, make sure you have the correct DNS server address. You can check with your provider or find publicly available DNS addresses.
Steps To Change The DNS Server On The Printer
Changing the DNS server on your printer usually involves accessing the settings area through its built-in screen. The process can vary depending on your printer’s brand and model. Here are some general steps to get you started:
- Turn on your printer and navigate to the “settings” menu
- Look for the “network” settings area
- Find the “DNS server” settings area and enter your new DNS server address
- Save your changes
Check your printer’s user manual or manufacturer’s website for specific instructions on how to change DNS settings.
Changing your DNS server can resolve connectivity issues between your Wi-Fi router and wireless printer. If these steps haven’t fixed the issue, consider contacting your manufacturer’s customer support for further assistance. Remember, a DNS server plays a vital role in network connectivity, so it pays to keep it up to date and take prompt action if there are any issues.
Reset The Router To Default Settings
Importance Of Resetting The Router To Default Settings
There can be various reasons for a Wi-Fi router to stop connecting to a wireless printer, and one of the most effective solutions is resetting the router to its default settings. It is essential to realize that resetting the router to its default setting helps to clear out any misconfigured settings that may be hindering the connection between the printer and the router.
Here are some key points to consider when resetting your router:
- Restoring your router to the default settings erases all your previous configurations, passwords, and personalized settings. Be sure to have a record of your current settings before proceeding with the reset.
- Resetting will help to wipe out any malware or software vulnerabilities that could be exploiting your router, improving your network’s security.
- When you reset your router, you will be able to fix most configuration-related issues that may cause your printer to stop connecting to your Wi-Fi network.
Steps To Reset The Router To Default Settings
Now that you’re aware of the importance of resetting your router, here are the steps you should follow to reset your router to default settings:
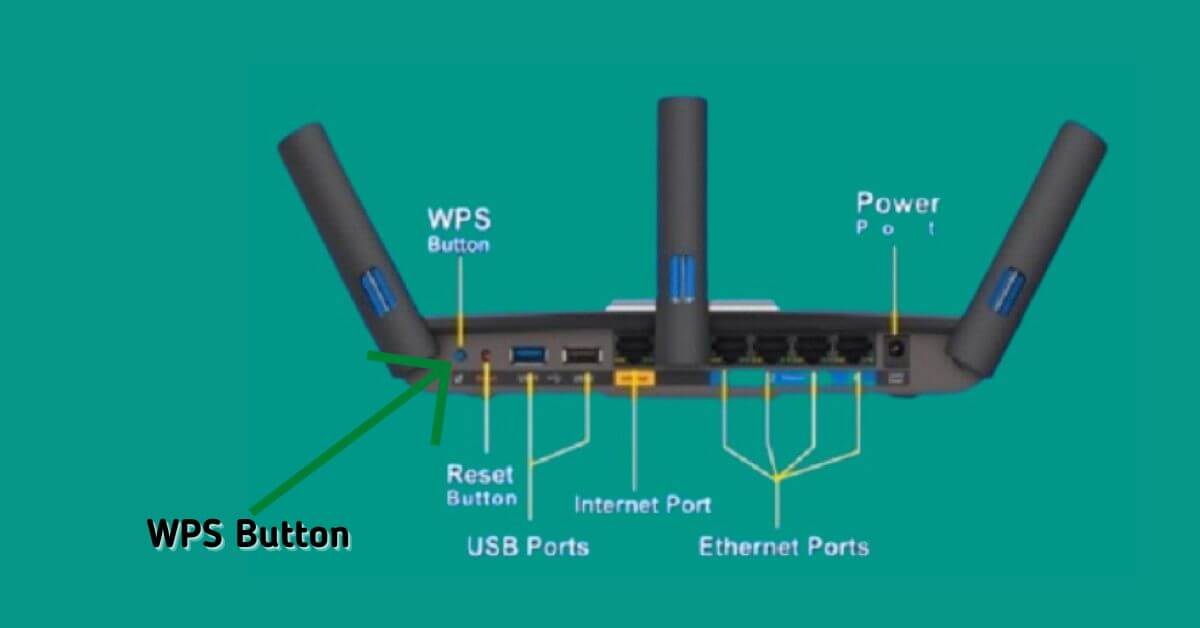
- Locate the reset button on your router. Typically, the button is found at the back of the router, labeled “reset.”
- Use a paper clip or pen tip to firmly press the reset button for around 10 seconds. Hold the button until your router’s lights start to blink.
- Wait for another 10-15 seconds after releasing the reset button, allowing the router to fully reset with the default settings.
- Once the router has restarted and booted, access the router settings page using a web browser. The default login credentials can be found printed on the label at the bottom of the router.
- After logging into the router, navigate to the “wireless settings” section and configure your Wi-Fi network. Be sure to choose the correct channel, encryption method, and password.
How To Reconnect The Printer To A Wi-Fi Network
Now that you have successfully reset your router, you can now proceed to reconnect your printer to the Wi-Fi network. Here are the steps to connect your printer to your Wi-Fi network:
- Turn on your printer and ensure it is in range of the Wi-Fi signal.
- On the printer’s control panel, navigate to the wi-fi settings. From there, select the option to set up a new network or to connect to an existing network.
- Your printer will now scan the available Wi-Fi networks. Select your Wi-Fi network and enter the correct password to connect to the network.
- Wait for your printer to establish a connection and confirm the successful connection via the control panel.
Resetting your router to its default settings is an effective way to fix connectivity issues between your Wi-Fi router and wireless printer. Be sure to configure your router settings correctly and reconnect your printer to the wi-fi network. Following these steps will ensure a successful connection between your printer and the wi-fi network.
Configure Router And Firewall Settings
Explanation Of Router And Firewall Settings
To connect your wireless printer to your router, you’ll need to ensure that your router and firewall settings are properly configured. Here’s what you need to know:
- Your router manages Wi-Fi devices and allows them to communicate with each other and the internet.
- A firewall is a security feature that monitors and filters incoming and outgoing network traffic to block any unauthorized access.
How To Configure The Router And Firewall Settings To Allow Printer Connection
Follow these simple steps to configure your router and firewall settings to allow your wireless printer to connect:
- Go to your router’s admin page by typing the router’s IP address into a web browser.
- Look for the wireless settings section and make sure that the wireless mode is set to “802.11b/g/n” and the wireless channel is set to “auto”.
- Look for the firewall settings section and enable UPnP (universal plug and play) and nat (network address translation).
- Save your changes and restart your router.
Steps To Configure The Printer To Work With The Router And Firewall
Now that your router and firewall settings are configured, you’ll need to set up your wireless printer to work with them. Here’s what you need to do:
- Connect your printer to your Wi-Fi network using the printer’s control panel.
- Once your printer is connected, go to your computer’s settings and select “printer and scanner”.
- Click on “add a printer or scanner” and wait for your computer to detect your printer.
- Once your printer is detected, select it and click on “add device”.
- If prompted, install the printer drivers and follow the on-screen instructions.
By following these steps, you should now be able to connect your wireless printer to your router and print wirelessly with ease.
Assign Static IP Address To The Printer
Explanation Of Static IP Addresses And Their Benefits
A static IP address is a permanent address assigned to a device connected to a network, unlike a dynamic IP address that changes each time the device reconnects to the network. The benefits of using a static IP address for your printer are:
- Faster and more reliable connections
- Easier and more stable network communication
- No need to reconfigure your printer’s settings each time it connects to the router
How To Assign A Static IP Address To The Printer
To assign a static IP address to your printer, you need to update its settings. Here are the steps you need to follow:
- Locate the printer’s IP address: To assign a static IP address to your printer, you need to know its current IP address. You can find this information by printing a network configuration page from your printer’s control panel, or by checking the DHCP client list on your router’s admin page.
- Log in to your router’s admin page: Open a web browser on your computer, type in your router’s IP address, and enter your login credentials. Look for the DHCP setup or LAN setup tab.
- Reserve the IP address: Find the DHCP reservations section of your router’s admin page. You need to assign the printer a reserved IP address that is outside of the DHCP range of addresses that your router uses. This will prevent your printer’s IP address from being reassigned to another device.
- Update the printer’s settings: Go to your printer’s control panel or web interface and configure the ip address to match the static IP address you just assigned it. Save your changes, and your printer is now configured with a static IP address.
By following these steps, you can easily assign a static IP address to your wireless printer, which will resolve connectivity issues and improve the stability of your network communication.
Restart Print Spooler Service
Explanation Of Print Spooler Service And Its Role In Printing
Print spooler service is a critical service in Windows that manages all printer communication on the computer. Its role is to manage the print jobs that are sent to the printer, ensuring they are processed correctly, and then, finally, sent to the printer.
Without this service, the operating system would not be able to communicate with the print queue and send the print jobs to the printer.
How To Stop And Restart The Print Spooler Service
Restarting the print spooler service can fix many problems related to connectivity between your Wi-Fi router and wireless printer. Here’s how:
- Click on the start button and type “services.msc” in the search box.
- Click on the “services” app to open it.
- Scroll down to the “print spooler” service.
- Right-click on the “print spooler” service and select “stop.”
- Wait for a few seconds right-click on the “print spooler” service again and select “start.”
Troubleshooting Tips
If restarting the print spooler service still doesn’t fix the issue, here are some additional troubleshooting tips:
- Ensure that the printer and router are both turned on and within range.
- Confirm that the printer is connected to the Wi-Fi network.
- Check the network settings on the printer to ensure they are configured correctly.
- Try using a different computer or mobile device to print to the printer.
- Check for any driver updates for both the printer and router.
- Restart the router and printer simultaneously.
- Try connecting to the printer with a USB cable to bypass the Wi-Fi connection.
By following these steps, you should be able to troubleshoot the issue and fix the connectivity problem between your Wi-Fi router and wireless printer.
Contact Technical Support
When To Contact Technical Support
Sometimes, the steps to fix a Wi-Fi router that is not connecting to a wireless printer can be complex, and only an expert can resolve the issue. Here are some situations when you should contact technical support to assist you:
- When you have tried all the basic troubleshooting steps and the problem persists.
- When you are unsure how to proceed with advanced troubleshooting or configuring settings specific to the device.
- When you suspect a hardware failure or malfunction.
How To Prepare Ahead Of Contacting Technical Support
Before getting in touch with technical support, it’s always useful to do some preparation. Doing so may optimize the time spent on the line and enable the technical support agent to diagnose the issue faster. Here are some ideas on how to prepare:
- Make sure the device is charged or connected to a power supply.
- Have the device information and model number ready, as well as the printer’s model number.
- Write down any error codes or messages displayed on the screen.
- Ensure that all the necessary cables are plugged in and correctly connected.
- Verify that there are no other devices connected to the same network that may cause interference.
What To Expect When Contacting Technical Support
Technical support agents are trained to support customers with the troubleshooting process. Here are some things you should expect when you contact technical support:
- Agents will verify your customer details and confirm the issue to ensure that they fully understand the situation.
- They may request remote access to your device to diagnose and resolve the issue.
- The agent will explain the process in simple terms, ensuring that you understand everything.
- They will guide you through each step of the troubleshooting process.
- The agent may offer additional resources or refer you to more advanced troubleshooting steps, such as factory reset procedures.
- After resolving the issue, they will ask if you have any other questions or concerns.
Remember to remain patient with the technical support agents, and above all, be honest with them. Answer their questions truthfully to ensure they can address the root cause of the issue.
Wireless Printer Connected but not Printing
If your wireless printer is connected but not printing, there could be several reasons for this issue. Here’s a step-by-step troubleshooting guide to help you resolve the problem:
- Check Printer Status: Make sure your printer is turned on and has enough paper and ink or toner. Look for any error messages or warning lights on the printer’s display.
- Verify Wireless Connection: Confirm that your printer is connected to the correct Wi-Fi network. You might need to re-enter the Wi-Fi password if the connection is lost.
- Restart Devices: Turn off both your printer and your computer or mobile device. Wait for a few seconds and then turn them back on. This can help refresh the connection.
- Check Printer Queue: Sometimes print jobs can get stuck in the queue, preventing new jobs from printing. Open the print queue on your computer and clear any pending jobs.
- Update or Reinstall Printer Drivers: Outdated or corrupted printer drivers can cause communication issues. Visit the printer manufacturer’s website to download and install the latest drivers for your printer model.
- Set Printer as Default: Ensure that your wireless printer is set as the default printer on your computer. Sometimes, print jobs might be sent to a different printer.
- Firewall and Security Software: Firewall or security software on your computer might block the communication between your computer and the printer. Temporarily disable such software and see if the printing works.
- Reset Network Settings on Printer: Some printers have a “Reset Network Settings” option in their menu. Use this option to reset the printer’s network settings and set up the connection again.
- Printer Firmware Update: Check if there’s a firmware update available for your printer. Updating the printer’s firmware can resolve compatibility and performance issues.
- Physical Connections: If your printer has physical connection options (USB, Ethernet), try connecting directly to your computer or router to see if printing works through those connections.
- Check for Paper Jams or Hardware Issues: Inspect the printer for any paper jams, open covers, or other hardware issues that might be preventing it from functioning properly.
- Router Issues: Sometimes, router settings can cause communication problems. Restart your router and ensure that it’s not blocking any necessary ports for printing.
- Test with Another Device: If possible, try printing from another device (e.g., smartphone or tablet) to determine if the issue is specific to one device.
- Contact Customer Support: If none of the above steps work, contact the printer manufacturer’s customer support for further assistance.
By following these troubleshooting steps, you should be able to identify and resolve the issue of your wireless printer not printing.
Frequently Asked Questions Of How To Fix A Wi-Fi Router That Is Not Connecting To Wireless Printer
How Do I Troubleshoot My Router When It’s Not Connecting To The Printer?
Check that your router is connected to the internet, your printer’s wireless connection is on, and that the router and printer are on the same network.
How Do I Reset My Router If My Printer Is Not Connecting To It?
Locate the reset button on your router, press and hold it for 10 seconds. Your router will restart, and you can try reconnecting your printer.
What Should I Do If My Printer Cannot Connect To My Router Wirelessly?
Check that your printer’s wireless feature is enabled, your router’s security settings are compatible with your printer, and that your Wi-Fi passwords match.
How Can I fix issues with my router’s Network Settings To Connect My Printer Wirelessly?
Log in to your router and double-check that the settings are correct and that your router’s firmware is up-to-date. You can also try restarting the router.
What Is The Recommended Router And Printer Security Setting For A Wireless Connection?
WPA2 psk (AES) encryption is the recommended security setting for both routers and printers, as it provides a high level of security and is compatible with most devices.
How Can I Check That My Printer Is Connected To The Correct Wireless Network?
Print a wireless network configuration page from your printer’s control panel and verify that the network name (SSID) and password are correct.
How Can I Troubleshoot My Router’s Wi-Fi Signal Strength?
Move your router to a different location, away from walls and other devices that may cause interference. You can also try changing the channel on your router’s wireless settings.
Can My Printer Connect To A Different Router Without Reconfiguration?
No, you will need to reconfigure your printer to connect to a new network by following the manufacturer’s instructions.
Can I Use A USB cable To Connect My Printer To The Router Instead Of A Wireless Connection?
Yes, you can connect your printer to your router using a USB cable. However, this will not allow you to print wirelessly from other devices on the same network.
How Can I Test If My Printer Is Successfully Connected To The Router Wirelessly?
Print a test page from your printer’s control panel or from a device on the same network. If the printer prints, it is successfully connected to the router wirelessly.
Final Thoughts
After going through all the methods mentioned above, we hope that you were able to fix your Wi-Fi router connection issue with a wireless printer. Accurate implementation of these methods might have helped you establish a seamless and hassle-free connection between the two devices.
Remember, it is always advisable to check the compatibility between the router and printer before making any purchase. Conducting a regular check on the firmware updates can save you from sudden connection disruptions. In case you are still facing issues with the connection, it is best to reach out to the manufacturer’s customer support center for assistance.
Always remember to keep your router and printer updated and secure to avoid any signal interruption or malware threats. We hope that this blog proved helpful in your quest to establish a stable connection between your router and wireless printer.
Good luck!


Leave a Reply
You must be logged in to post a comment.