Why is changing your WiFi name and password important?
Changing your WiFi name and password may seem like a trivial task, but it is actually crucial for the security and privacy of your network. Many people do not realize that leaving their default WiFi name (also known as SSID) and password unchanged can make them vulnerable to cyber-attacks. Hackers can easily identify the default names of popular routers and use this information to launch targeted attacks. By changing these credentials, you ensure that your network remains one step ahead of malicious intent.
Furthermore, changing your WiFi name and password also helps you maintain control over who accesses your network. Let’s face it, almost every home or office has multiple devices connected to the internet through the same router. By personalizing your WiFi name, you make it easier for yourself to identify which networks belong to you in an environment with many available connections. Additionally, regularly updating your WiFi password ensures that only authorized users are able to connect. This prevents neighbors or passersby from freeloading on your bandwidth or even using your network illicitly.
Finally, changing the default settings of your WiFi network by giving it a unique name and regularly updating its password adds an extra layer of security and control over who accesses it. It’s a small yet significant step in protecting yourself from cyber threats and unauthorized users accessing personal or sensitive data on laptops, smartphones, or other connected devices at home or work.
How to change WiFi Name and Password in 5 steps
Step 1: Accessing your router’s settings page
To change your WiFi name and password, you first need to access your router’s settings page. This is where you can make all the necessary changes to personalize your network. To begin, ensure that you are connected to your home WiFi network. Open a web browser on your computer, tablet, or smartphone, and type the IP address of your router into the address bar.
If you’re unsure about what the IP address of your router is, don’t worry; there are simple steps to find it. On Windows, you can go to the Command Prompt by pressing the Windows key + R, typing cmd, and then hitting enter. In the Command Prompt window, type ipconfig and press enter. Look for the default gateway under Ethernet adapter or Wireless LAN adapter. Like as default gateway: 192.168.1.1 or 192.168.0.1
Once you have obtained the IP address of your router, type it into the browser’s address bar and hit enter. You should now be prompted with a login page asking for a username and password. If you haven’t changed these credentials before, consult your manual or research online for default usernames and passwords specific to your router model.
Accessing your router’s settings page grants you full control over crucial aspects of setting up a secure network connection at home or in an office environment. It offers not only convenience but also a heightened level of security by allowing users to manage their WiFi networks manually.
Remember that each brand has its own unique process for accessing their routers’ settings pages; however, most manufacturers follow similar procedures described above. Always check online.
Step 2: Locating the WiFi settings section
Once you have logged in to your router’s admin panel, the next step in changing your WiFi name and password is locating the WiFi settings section. Typically, you can find this section under a tab labeled Wireless or WiFi Settings. However, it is important to note that different router manufacturers may use slightly different terminology or navigation menus. Therefore, if you don’t immediately see a clear option for WiFi settings, try looking under other tabs such as Network, LAN, or even Advanced Settings.
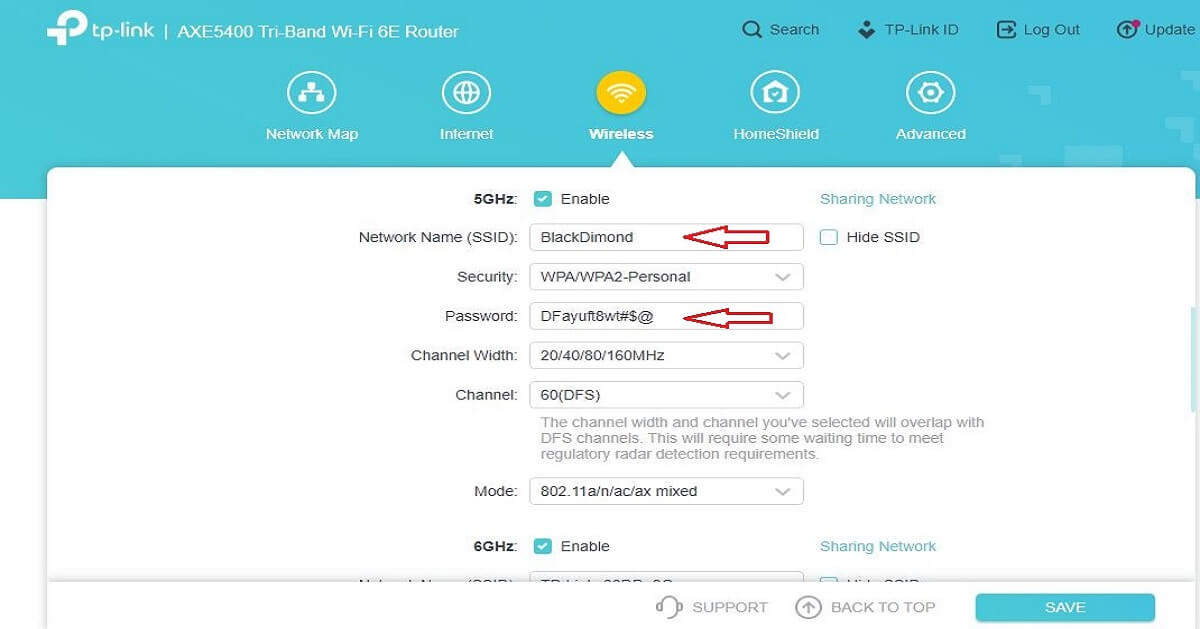
Once you find the WiFi settings tab, you will likely come across various options related to your wireless network. One of the first things you will want to do is locate the current name of your network, also known as the SSID (Service Set Identifier). This is usually displayed prominently on the screen and typically consists of a combination of letters and numbers assigned by your router manufacturer. Take note of this SSID as it will be helpful when setting up a new name for your network.
Additionally, within the WiFi settings section, you might find options to enable or disable guest networks if supported by your router model. Guest networks are useful when you want to provide internet access to visitors without giving them access to your main network. It’s worth exploring these options and considering whether they align with your specific needs and security preferences.
Overall, locating the WiFi settings section might require some exploration within your router’s admin panel. Remember that while specific terms and placement may vary between routers, persistence, and patience will pay off in finding the right settings. Once you have accessed the WiFi settings section, take a moment to review the available options.
One important aspect to consider is the network name or SSID (Service Set Identifier). This is the identifier that devices use to connect to your WiFi network. It’s advisable to choose a unique and easily recognizable name for your network, but avoid using any personal information that could potentially compromise your security.
Next, you’ll want to set up a strong password for your WiFi network.
Step 3: Changing the WiFi name (SSID)

Changing the WiFi name, also known as the SSID (Service Set Identifier), is an important step in ensuring your network remains secure and unique. Many people overlook this step and underestimate its importance in protecting their personal information. By changing the default SSID provided by your internet service provider, you create a barrier for potential hackers looking for easy targets.
When choosing a new WiFi name, it’s essential to strike a balance between creativity and practicality. While it may be tempting to opt for quirky or humorous names, remember that you want it to be easily recognizable and memorable to guests who may need to connect to your network. Additionally, avoid using any personal information or easily guessable details such as your address or phone number in the SSID.
Changing the WiFi name can also enhance your home network experience beyond just security concerns. By customizing your network’s identity, you can inject some personality into this often mundane aspect of daily life. Whether it’s reflecting your favorite movie quotes, showcasing support for sports teams, or simply adopting a clever play on words – with a unique WiFi name, you’re not only securing your connection but making a statement about yourself too.
Step 4: Changing the WiFi password

Changing the WiFi password is an essential step in maintaining a secure home network. It provides an additional layer of protection against unauthorized access and ensures that only trusted individuals can connect to your network. But beyond security benefits, changing the WiFi password also allows you to customize it according to your preferences or make it more memorable.
Additionally, changing the WiFi password can be useful in situations where you suspect someone has access to your network without permission. By frequently updating the password, you prevent potential intruders from gaining continued access. This simple act helps maintain control over who uses your network and minimizes the risk of bandwidth theft or misuse.
For those who prefer convenience, some routers even offer guest network features, allowing visitors limited access to the internet without compromising the security of your main network. Through this feature, guests receive their own unique password that expires after a set period, promoting a seamless online experience while safeguarding sensitive personal information.
By actively changing your WiFi password regularly and considering advanced features like guest networks, you can prioritize security while enjoying uninterrupted connectivity.
Step 5: Restarting your router and connecting devices
Once you have successfully changed your WiFi name and password, the next step is to restart your router. This might seem like an unnecessary step, but it is crucial to ensure that the changes you made take effect. Restarting your router allows it to refresh its connection and update all connected devices with the new network information.
To restart your router, simply unplug it from the power source, wait for about 10 seconds, and then plug it back in. After a couple of minutes, your router should be up and running again. Now comes the fun part – connecting all of your devices to the newly named WiFi network.
To connect a device, go to its settings menu and select Wi-Fi. You should see a list of available networks pop up on your screen. Look for the name you just changed it to (or check if it automatically updates), and enter the new password when prompted. Once entered correctly, voila! Your device is now connected to the updated WiFi network.
By restarting your router and reconnecting all devices after changing the WiFi name and password, you can ensure a smooth transition without any hiccups. It also provides an opportunity to clean up unused or outdated devices that may still be connected to your old network. Taking these simple steps will not only enhance security but also optimize performance for all connected devices on your newly configured WiFi network.
Final Thoughts
In conclusion, changing your WiFi name and password is a simple yet powerful way to ensure the security of your internet network. By personalizing these details, you can create a sense of ownership and exclusivity over your WiFi, making it less susceptible to unauthorized access. Not only will this protect your sensitive data from potential hackers or intruders, but it will also give you peace of mind knowing that you have taken steps to safeguard your online activities.
Moreover, renaming and resetting your WiFi credentials allows you to avoid the common mistake of using default router names or passwords. Many people tend to overlook this aspect and keep the factory default settings unchanged for their convenience. However, hackers are well aware of these commonly used names and passwords, making it easier for them to break into such networks. Taking the time to choose a unique WiFi name and strong password ensures that you are one step ahead in protecting your network from unwanted guests.
By following the steps outlined in this article, you can enjoy both security and personalization when it comes to using a WiFi network. Remember that as technology advances, so do the methods employed by cybercriminals to exploit vulnerabilities. Regularly changing your WiFi name and password is an essential practice in maintaining a secure digital environment for yourself and others connected to your network. So take charge today and experience the benefits of an enhanced wireless connection first.


Leave a Reply
You must be logged in to post a comment.