To connect an Ethernet cable to a wireless router, simply insert one end of the cable into any of the available Ethernet ports on the router, and the other end into the Ethernet port on your device.
This allows for a direct, wired connection between your device and the router, providing a faster and more stable internet connection.
The process of connecting an Ethernet cable to a wireless router is straightforward and can significantly enhance your internet experience.
By establishing a wired connection, you can ensure a reliable and speedy internet connection for activities such as online gaming, streaming, or large file downloads.
We will guide you through the simple steps to connect an Ethernet cable to your wireless router effortlessly.

Understanding The Basics
When it comes to connecting your devices to a wireless network, there are two primary options you may encounter: Ethernet and wireless connections.
Both methods have their advantages and considerations, so it’s important to understand how they differ and when to use each one.
Differentiating Ethernet and Wireless Connections
Ethernet and wireless connections are two distinct ways of connecting devices to your wireless router. Here’s how they differ:
- Wired Connection: Ethernet cables are physical cables that connect your device directly to the router. The advantage of this type of connection is its stability and reliability. Data is transmitted through the cable without interference, making it ideal for online gaming, streaming, and large file transfers.
- Wireless Connection: On the other hand, wireless connections use radio waves to transmit data between your device and the router, eliminating the need for physical cables. While wireless connections offer convenience and mobility, they may be subject to interference from other devices and obstacles, potentially leading to slower speeds and less stable connections.
Benefits of Using Ethernet Cable with a Wireless Router
Now that you understand the difference between Ethernet and wireless connections, let’s explore the benefits of using an Ethernet cable with your wireless router:
- Enhanced Speed and Stability: By connecting your device directly to the router using an Ethernet cable, you avoid the potential interference and signal loss that can occur with wireless connections. This results in faster and more stable internet speeds, particularly when engaging in data-intensive activities.
- Reduced Latency and Lag: Ethernet connections offer lower latency and reduced lag compared to wireless connections. This is particularly important for online gaming and real-time applications where even a slight delay can significantly impact your experience.
- Secure Connection: Wired connections are considered more secure than wireless connections, as they are less susceptible to hacking and unauthorized access. If you prioritize security and privacy, using an Ethernet cable can provide an extra layer of protection.
- Compatibility with Older Devices: Some older devices may not support wireless connectivity or may have limited wireless capabilities. By using an Ethernet cable, you can ensure compatibility and a reliable internet connection for these devices.
Now that you understand the basics of Ethernet connections and the benefits of using an Ethernet cable with your wireless router, you’re ready to connect your devices and experience the advantages of a stable and fast internet connection.
Required Materials
In order to connect an Ethernet cable to a wireless router, you will need a few materials to ensure a successful setup. The required materials include the necessary equipment and checking the compatibility of the Ethernet cable and wireless router. Let’s dive into each of these requirements:
Gathering the Necessary Equipment
Before you start connecting an Ethernet cable to a wireless router, make sure you have the following materials handy:
- An Ethernet cable: Ensure the cable is long enough to connect your devices.
- A wireless router: This is the central device that allows you to create a wireless network in your home or office.
- A device with an Ethernet port: This can be a laptop, desktop computer, gaming console, or any other device that can connect to the router using an Ethernet cable.
Having these materials ready will save you time and frustration during the setup process.
Checking Compatibility of the Ethernet Cable and Wireless Router
Before you connect the Ethernet cable to the wireless router, it’s important to verify that they are compatible with each other. Follow these steps to ensure a seamless connection:
- Check the connectors: Look at both ends of the Ethernet cable to make sure they have the proper connectors. The most common type is the RJ-45 connector.
- Inspect the wireless router: Examine the ports on the back of the router. You should see a labeled port indicating it is for Ethernet connections. It is often referred to as the WAN or LAN port.
- Ensure matching speeds: Ethernet cables come in different categories, such as Cat5, Cat6, or Cat7. Verify that the cable you have supports the same speed or higher than the wireless router.
- Consider the length: If you need to cover a long distance between your devices, make sure the Ethernet cable length is sufficient. Longer cables may have signal degradation, so it’s essential to choose an appropriate length.
By following these compatibility checks, you can be confident that your Ethernet cable and wireless router will work together seamlessly. It’s crucial to ensure compatibility to avoid any disruption in your network connection. Now that you have gathered the necessary equipment and checked the compatibility, you are ready to connect the Ethernet cable to the wireless router. Stay tuned for the next section of this step-by-step guide on how to establish a stable connection between your devices.
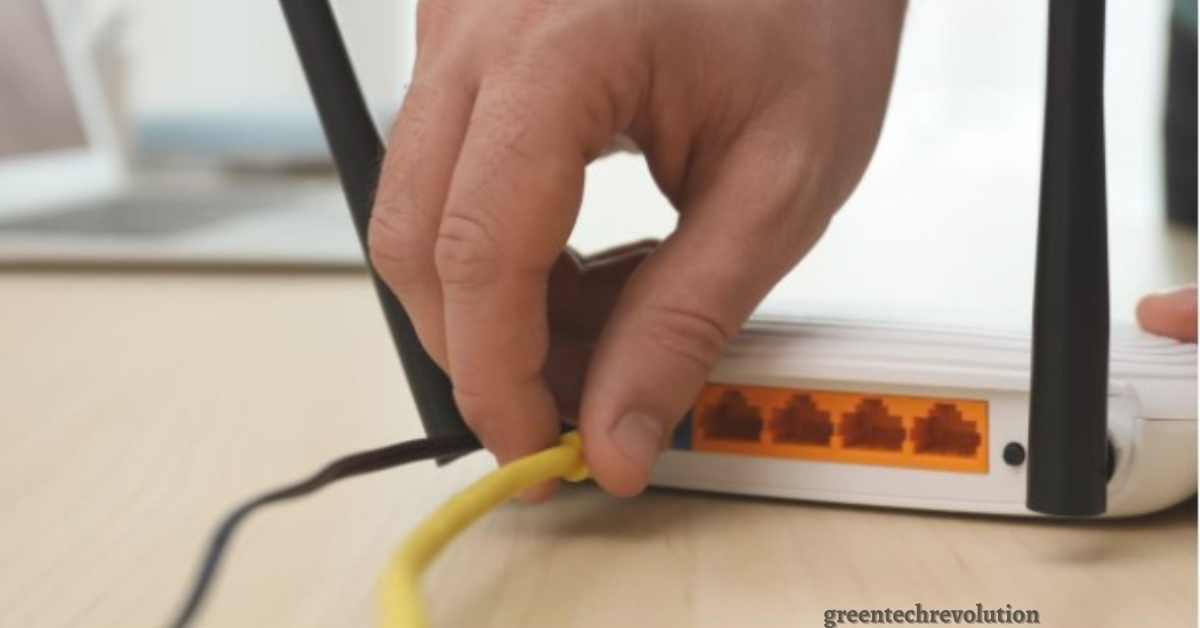
Connecting The Ethernet Cable To The Wireless Router
In order to connect your Ethernet cable to a wireless router, you will need to locate the Ethernet port on the router and insert the cable securely. By following these simple steps, you can ensure a stable and reliable connection between your devices and the network.
Locating the Ethernet Port on the Wireless Router
The Ethernet port on a wireless router is usually found on the back or side of the device. It is typically labeled with the word “Ethernet” or an image depicting a series of horizontal lines. If you are having trouble locating the port, refer to the router’s user manual or look for any label that indicates the presence of an Ethernet port.
Inserting the Ethernet Cable into the Ethernet Port
Once you have identified the Ethernet port on your wireless router, you can proceed to insert the Ethernet cable. Follow these steps:
- Ensure that the wireless router and the device you want to connect are powered off to avoid any potential damage.
- Take one end of the Ethernet cable and align the connector with the Ethernet port on the router.
- Make sure the connector is oriented correctly, ensuring that the plastic tab on the connector aligns with the groove on the port.
- Gently push the connector into the Ethernet port until it is fully seated.
- Give the cable a slight tug to ensure that it is securely connected to the port.
Once the cable is securely inserted into the Ethernet port, you can power on your wireless router and the connected device. The wired connection should now be established, allowing for high-speed and reliable data transfer between the device and the network.
Configuring Network Settings
When it comes to setting up your wireless router, configuring the network settings is an essential step to ensure smooth connectivity.
In this section, we will walk you through the process of accessing the router’s administration interface and configuring the LAN settings for an Ethernet connection.
By following these steps, you will be able to connect your Ethernet cable to the wireless router and optimize your network settings for a reliable and high-speed internet connection.
Accessing the Router’s Administration Interface
Before you can configure the network settings, you need to access the router’s administration interface. This interface allows you to make changes to the router’s settings and customize it according to your needs. To access the router’s administration interface, follow these simple steps:
- Connect your computer to the router using an Ethernet cable. Ensure that the cable is securely plugged into the Ethernet port on both the computer and the router.
- Open a web browser of your choice, such as Google Chrome or Mozilla Firefox.
- In the address bar of the web browser, enter the default IP address of your router. This IP address can usually be found in the router’s user manual or on the manufacturer’s website. It typically looks something like “192.168.1.1” or “192.168.0.1”.
- Press Enter on your keyboard to load the router’s login page.
- Enter the username and password for the router. These credentials are also provided in the user manual or on the manufacturer’s website. If you have not changed the default login credentials, you can try using “admin” for both the username and password fields. It is highly recommended to change the default username and password for improved security.
- Once logged in, you will be able to access the router’s administration interface and make changes to the network settings.
Configuring the LAN Settings for Ethernet Connection
Now that you have accessed the router’s administration interface, it’s time to configure the LAN settings specifically for your Ethernet connection. These settings allow your router to communicate with the devices connected through the Ethernet cable. Follow these steps to configure the LAN settings:
- Navigate to the LAN settings section in the router’s administration interface. The location of this section may vary depending on the router model.
- Select the Ethernet connection option or LAN settings related to the Ethernet port.
- Set the IP address for the router’s LAN interface. It is recommended to use a private IP address that falls within the range of “192.168.1.1” or “192.168.0.1”.
- Specify the subnet mask for the LAN. The subnet mask determines the size of the network and the range of IP addresses that can be assigned to devices connected through Ethernet.
- Configure the DHCP settings, if desired. DHCP allows the router to automatically assign IP addresses to devices connected through Ethernet. Alternatively, you can set static IP addresses for your devices manually.
- Apply the changes and save the settings.
By configuring the LAN settings for your Ethernet connection, you have successfully optimized your network settings for seamless connectivity.
These steps ensure that your router can efficiently manage the connected devices and provide a stable and secure internet connection. As a result, you can enjoy a smooth browsing experience and enhanced network performance.
Testing The Connection
Verifying the Ethernet Connection
Once you have successfully connected the Ethernet cable to your wireless router, it is important to test the connection to ensure it is working properly. Verifying the Ethernet connection will help you determine whether the cable is properly connected and if there are any issues that need to be addressed.
Troubleshooting Common Issues with Ethernet Connection
If you encounter any problems with the Ethernet connection, there are a few common issues that you can troubleshoot:
- Check cable connections: Ensure that the Ethernet cable is securely connected to both the router and your device. Sometimes a loose connection can result in a weak or unstable signal.
- Test with a different cable: If you suspect that the cable may be faulty, try using a different Ethernet cable to see if the issue persists. This will help determine if the problem lies with the cable or another component.
- Restart the router: Sometimes a simple restart can do wonders. Turn off your router, wait for a few seconds, and then turn it back on. This can help resolve any temporary glitches that may be affecting the Ethernet connection.
- Update network drivers: Outdated or corrupt network drivers can cause connectivity issues. Check for any updates for the network drivers on your device and install them if necessary. This can improve and stabilize your Ethernet connection.
- Disable firewall or antivirus software: In some cases, firewall or antivirus software can block the Ethernet connection. Disable these temporarily and check if the connection improves. If it does, adjust the settings of the software to allow the Ethernet connection.
By troubleshooting these common issues, you can ensure that your Ethernet connection is working optimally. Remember to test the connection regularly to identify any potential problems and address them promptly.
Advanced Ethernet Configurations
When it comes to advanced Ethernet configurations, it’s not just about plugging in the cable and connecting to the router.
There are additional steps you can take to optimize your Ethernet connection for maximum performance and security.
In this section, we will explore two important advanced configurations: setting up a static IP address for the Ethernet connection and configuring port forwarding for specific services.
Setting Up a Static IP Address for the Ethernet Connection
In a basic Ethernet setup, your router assigns an IP address to your device dynamically. However, by setting up a static IP address, you have more control over your network connection.
A static IP address remains constant and is not subject to change, ensuring that your device always has the same IP address when connected to the router.
This can be useful for tasks that require a consistent IP address, such as setting up a server or accessing devices on a local area network. To set up a static IP address for your Ethernet connection, follow these steps:
- Access your router’s web-based configuration interface by typing the router’s IP address in your web browser.
- Navigate to the LAN settings or DHCP settings section.
- Locate the option for setting a static IP address and enter the desired IP address along with the subnet mask and default gateway.
- Save the changes and restart your router.
Configuring Port Forwarding for Specific Services
If you want to access a specific service or application from outside your network, such as hosting a website or running a gaming server, you will need to configure port forwarding. Port forwarding allows incoming data to bypass the router’s firewall and be directed to a specific device on your network. To configure port forwarding for a specific service, follow these steps:
- Access your router’s web-based configuration interface.
- Navigate to the port forwarding or virtual server settings section.
- Specify the service or application for which you want to forward ports.
- Enter the internal IP address of the device where the service is running.
- Define the port range or specific port numbers to be forwarded.
- Save the changes and restart your router.
By setting up a static IP address and configuring port forwarding, you can enhance the functionality and security of your Ethernet connection. Remember to consult your router’s user manual or check the manufacturer’s website for specific instructions as the interface may vary depending on the router model.
Securing The Ethernet Connection
The Ethernet connection between your wireless router and devices is an essential component of your network setup. However, ensuring its security is often overlooked by many users. In this section, we will explore important steps to secure your Ethernet connection, including enabling network encryption and implementing firewall and security measures.
Enabling Network Encryption
To enhance the security of your Ethernet connection, enabling network encryption is crucial. Network encryption translates data into a coded format, making it difficult for unauthorized individuals to access your network. By following these steps, you can enable network encryption for your Ethernet connection:
- Access your wireless router’s settings by entering the router’s IP address into your web browser.
- Once logged in, navigate to the wireless settings section.
- Look for the option that enables WPA2 or WPA3 encryption. These encryption standards offer increased security compared to older versions.
- Enable the encryption option and set a strong password or passphrase, consisting of a combination of uppercase and lowercase letters, numbers, and special characters.
- Save the changes and restart your router for the settings to take effect.
Implementing Firewall and Security Measures for the Ethernet Connection
In addition to network encryption, implementing firewall and security measures for your Ethernet connection adds an extra layer of protection. Firewalls act as a barrier against unauthorized access and can prevent malicious software from gaining access to your network. Follow these steps to implement firewall and security measures:
- Access your router’s settings.
- Navigate to the firewall settings section. Here, you may find options for configuring inbound and outbound rules.
- Enable the firewall feature if it is not already enabled.
- Configure the firewall settings to allow only trusted connections and block suspicious or harmful traffic.
- Consider implementing additional security measures such as MAC address filtering, which allows only specific devices to connect to your network.
- Regularly update your router’s firmware to ensure you have the latest security patches.
By following these steps to secure your Ethernet connection, you can safeguard your network from potential threats and ensure that your data remains protected. Remember, security should never be compromised, and by taking proactive measures, you can establish a secure and reliable network environment.
Maximizing Ethernet Performance
Getting the most out of your Ethernet connection is essential for a fast and reliable network experience. By ensuring proper cable placement and length, as well as optimizing network speed and performance, you can make the most of your Ethernet connection. In this article, we will discuss these two important factors in detail to help you achieve maximum Ethernet performance.
Ensuring Proper Cable Placement and Length
Proper cable placement and length are crucial for minimizing signal loss and interference, which can significantly impact your Ethernet connection’s performance. Here are some key considerations:
- Cable Routing: When connecting your Ethernet cable to a wireless router, it’s important to route the cable away from potential sources of interference, such as electrical wires, fluorescent lights, and other electronic devices. This helps minimize electromagnetic interference (EMI) and ensures a clean, uninterrupted signal.
- Cable Length: Ethernet cables come in various lengths, and choosing the right length is crucial for optimal performance. As a general rule, it’s best to keep cable lengths as short as possible while still allowing for flexibility in device placement. Long cables can introduce signal degradation, resulting in slower network speeds. Using excessively long cables can also increase the likelihood of cable tangling or accidental damage.
- Cable Quality: Investing in high-quality Ethernet cables can make a noticeable difference in performance. Cat6 or Cat6a cables are recommended for maximum speed and reliability. These cables are designed to minimize crosstalk and interference, offering superior performance over older cable types.
Optimizing Network Speed and Performance for Ethernet Connection
Once you have ensured proper cable placement and length, there are a few additional steps you can take to optimize your network speed and performance:
- Updating Router Firmware: Regularly check for firmware updates for your wireless router. Firmware updates often include performance improvements, bug fixes, and added features that can enhance your Ethernet connection’s speed and stability.
- Adjusting Router Settings: Access your router’s settings and make sure you have the appropriate bandwidth settings enabled for your connection type (e.g., Mbps or Gbps). Additionally, consider enabling Quality of Service (QoS) settings to prioritize certain devices or applications on your network, ensuring smoother performance for critical tasks like video streaming or online gaming.
- Checking Network Equipment: Ensure that all of your network equipment, including your modem and router, are in good working condition. Faulty equipment can result in reduced speeds or intermittent connectivity issues. If necessary, consider upgrading to newer, more advanced equipment to take full advantage of your Ethernet connection’s capabilities.
By following these simple steps for cable placement, length, and network optimization, you can maximize the performance of your Ethernet connection. Enjoy faster, more reliable network speeds for all your online activities!
Troubleshooting And FAQs
When it comes to connecting an Ethernet cable to a wireless router, it’s not uncommon to encounter a few issues along the way. The good news is, that most of these issues have simple solutions. In this section, we’ll cover some commonly encountered issues and potential solutions, as well as address frequently asked questions to help troubleshoot any problems you might face.
Commonly Encountered Issues and Potential Solutions
While connecting an Ethernet cable to a wireless router is a fairly simple process, you may come across a few hiccups along the way. Here are some common issues you might encounter and their potential solutions:
- Issue: No internet connection after connecting Ethernet cable to the router. Solution: Make sure that the Ethernet cable is securely plugged into both the router and your device. Restart your device and check if the connection is established. If the issue persists, try using a different Ethernet cable or resetting your router.
- Issue: Slow or unstable internet connection. Solution: Check if there are any physical obstacles or interference near your router that may be affecting the signal strength. You can also try relocating the router to a central location in your home or office. Additionally, ensure that your router’s firmware is updated to the latest version.
- Issue: Unable to detect the Ethernet connection. Solution: Ensure that your device’s Ethernet port is functioning properly. You can test this by connecting a different device using the same Ethernet cable. If the issue is only with your device, check the network adapter settings in your device’s control panel or settings menu.
- Issue: Limited connectivity or “Unidentified Network” error. Solution: Try resetting your router and restarting your device. If the issue persists, check if the network settings on your device are set to obtain an IP address automatically. Alternatively, you can manually configure the IP address and DNS settings based on your network’s requirements.
Frequently Asked Questions about Connecting Ethernet Cable to Wireless Router
Here are some commonly asked questions and answers related to connecting an Ethernet cable to a wireless router:
| Question: Can I connect multiple devices to a wireless router using Ethernet cables? | Answer: Yes, you can connect multiple devices to a wireless router using Ethernet cables by utilizing LAN ports available on the router. |
| Question: Is it better to use a wired connection instead of a wireless connection? | Answer: Wired connections generally offer higher reliability and faster speeds compared to wireless connections. If you require a stable and faster connection, using Ethernet cables is recommended. |
| Question: How long can an Ethernet cable be for a reliable connection? | Answer: Ethernet cables can typically reach up to 100 meters (328 feet) before the signal may start to degrade. For longer distances, you may need to use additional networking equipment, such as repeaters or switches. |
By following these troubleshooting tips and addressing frequently asked questions, you should be able to successfully connect an Ethernet cable to your wireless router and enjoy a stable and reliable internet connection.
Frequently Asked Questions On How To Connect Ethernet Cable To Wireless Router
Can I Connect Ethernet To A Wireless Router?
Yes, you can connect Ethernet to a wireless router.
How Do I Connect My Ethernet Cable To Wi-Fi?
To connect your Ethernet cable to Wi-Fi, follow these steps:
- Plug one end of the Ethernet cable into the Ethernet port on your device.
- Access the Wi-Fi settings on your device.
- Select your Wi-Fi network from the available options.
- Enter the Wi-Fi password if prompted.
- Wait for your device to establish a Wi-Fi connection. Note: Please consult your device’s manual or contact customer support for specific instructions.
Do I Need An Ethernet Cable To Setup A Wireless Router?
Yes, you need an Ethernet cable to set up a wireless router.
How Do I Connect An Ethernet Cable To A Wireless Router?
To connect an Ethernet cable to a wireless router, simply plug one end of the cable into an available Ethernet port on the router and the other end into the Ethernet port on your device.
Can I Connect Multiple Devices Using Ethernet To A Wireless Router?
Yes, you can connect multiple devices to a wireless router using Ethernet cables. Each device needs to be connected to a separate Ethernet port on the router.
What Are The Benefits Of Connecting Via Ethernet To A Wireless Router?
Connecting via Ethernet to a wireless router can provide a faster and more stable internet connection compared to Wi-Fi. It also eliminates potential interference from other devices and offers a secure connection.
How Do I Know If My Device Has An Ethernet Port?
You can check if your device has an Ethernet port by looking for a rectangular-shaped port on the side or back of your device. It is usually labeled “Ethernet” or “LAN. “
Can I Connect A Wireless Router To A Modem Using An Ethernet Cable?
Yes, you can connect a wireless router to a modem using an Ethernet cable. Simply connect one end of the cable to the modem’s Ethernet port and the other end to the router’s WAN port.
Do I Need A Special Ethernet Cable To Connect To A Wireless Router?
No, you do not need a special Ethernet cable to connect to a wireless router. Any standard Ethernet cable will work for connecting your device to the router.
Is It Possible To Use An Ethernet Cable With A Wi-Fi-Only Device?
Yes, it is possible to use an Ethernet cable with a Wi-Fi device by connecting it to an Ethernet-to-Wi-Fi adapter. This allows the device to use a wired Ethernet connection instead of Wi-Fi.
Final Thoughts
To ensure a seamless internet connection, it is essential to know how to connect an Ethernet cable to a wireless router. By following the step-by-step process, you can enjoy faster and more stable internet access.
The first step is to identify the Ethernet port on your router and plug one end of the cable into it. Then, locate the Ethernet port on your device and plug the other end of the cable into it.
After connecting the cable, you may need to configure your router settings to allow wired connections. This can be done by accessing the router’s admin panel and navigating to the network settings.
Remember to restart both your router and device to apply the changes. With a successful Ethernet cable connection to your wireless router, you can experience enhanced network performance and uninterrupted connectivity.
So, get ready to enjoy a more reliable online experience!


Leave a Reply
You must be logged in to post a comment.